The Bass Trick Passive Can’t Pull Off
Mar 3, 2026
Active + DSP Speakers: The Bass Trick Passive Can’t Pull Off
Passive crossovers can sound great, but they have many shortcomings. Your crossover slopes are rarely exactly what the spreadsheet predicts. Driver impedance nudges the crossover point around. Part tolerances stack up. Inductors add series resistance and distortion if iron core. Your carefully chosen design ends up being mostly right, but never quite as exact as you imagined. Quality passive crossover parts are EXPENSIVE, so you may sacrifies the design to save $$$ (e.g. forego adding that notch filter that your cone breakup needs, or crossover higher than you would like, etc etc) Finally, tweaking the design means ordering more parts and waiting for them to arrive.
Designing active speakers with DSP is the opposite. They are the “I’ll change it and measure/listen again” approach. You get:
- Precise crossover slopes, not “approximately LR4 after impedance does its thing”
- Time alignment and phase alignment (your impulse response stops looking like a crime scene)
- Easy notches, shelves, baffle step, breakup cleanup, and general “make it behave” EQ
- Built-in protection (high-pass filters, limiters) so your woofer does not get punished below tuning
- Fast iteration: minutes, not days and a pile of solder smoke
- Room integration: presets for placement, low-frequency EQ, sub integration, the whole deal
All of that is reason enough to go active.
But there is one trick that, if you do it correctly, feels like magic.
And once you have used it, it is hard to unsee the advantage.
The bass-extension trick: “Tune low, then help the radiator”
Here is the idea in plain language.
1) You build a bass-reflex system. That can be a port, or it can be a passive radiator. 2) You tune it a bit lower than you normally would if your goal was a maximally-flat passive alignment. 3) Then you use DSP to apply one specific filter: a peaking high-pass centered around the tuning region.

If you do it right, you can often get meaningfully deeper bass from the same box, without turning your woofer into a mechanical stress-test.
In the figure on the right you can see that the f3 is extendend by ~12 Hz from 47 Hz to 35 Hz. And f10 is extended from 44 Hz to 38 Hz.
This translates to appreciable improvements in bass guitars, kick drums, and movie sound effects.
Why this is even possible
Ported boxes and passive radiators share a very useful property:
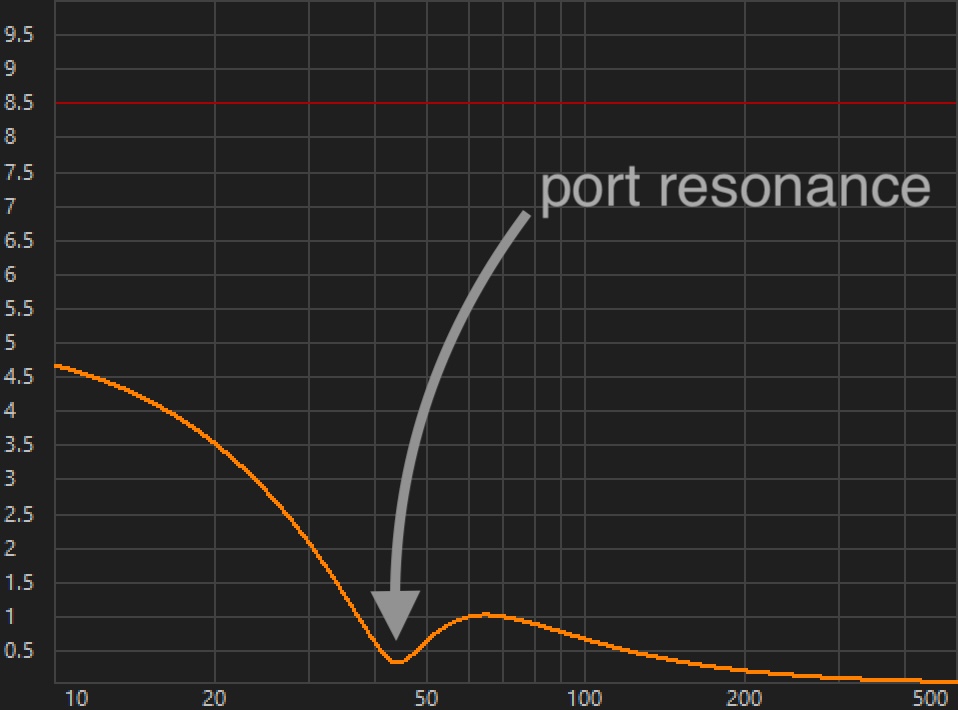
Right at the tuning frequency (Fb), the cone barely moves.
That is not magic, it is physics. Around Fb, the port or passive radiator is doing most of the radiating. The driver sees a strong acoustic load and cone excursion drops. In other words:
- The port or passive radiator is working hard
- The cone is taking a break
This is the opening that DSP gives you. Because cone excursion is naturally reduced near Fb, you can apply some lift there and get more output without immediately exceeding excursion limits at that frequency.
Passive speakers generally cannot take advantage of this, because low-frequency “boost” with passive components is bulky, lossy, expensive, and it interacts with driver impedance. Also, the safe version of the trick requires protection below tuning, and passive networks do not provide that in a clean, adjustable way.
DSP makes it trivial.
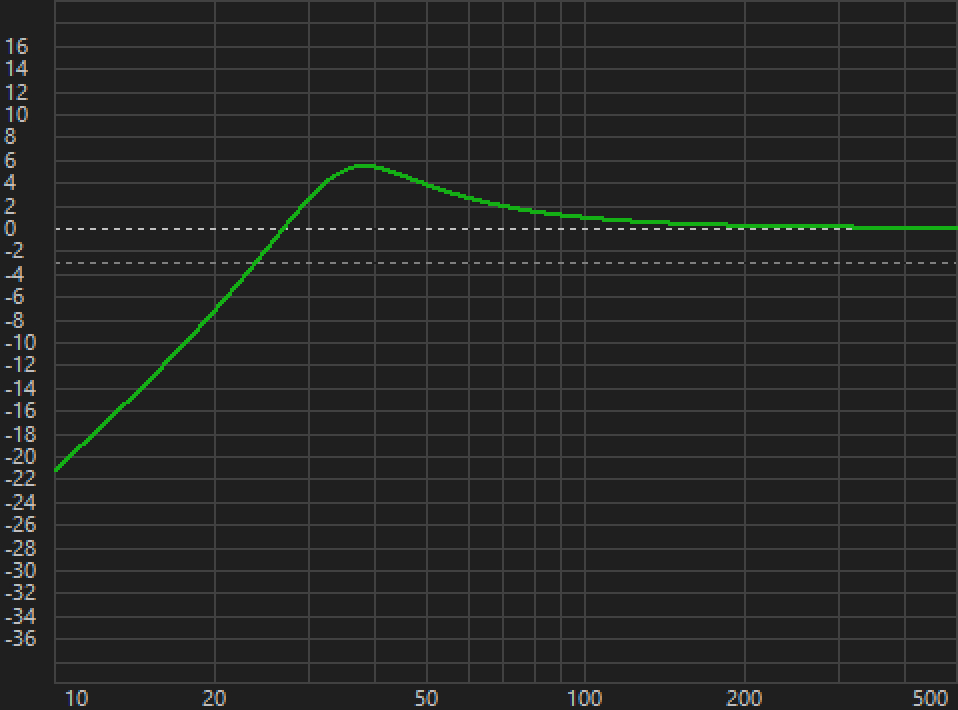
The one filter you need: the peaking high-pass
For this trick, we are going to keep it simple and focus on one tool: a peaking high-pass.
Why this filter is a great fit:
- It gives you a controlled “bump” of extra output around your target frequency.
- It also rolls off below that region, which helps protect the driver from unloading below Fb.
It’s like two birds with one stone.
A warning (Port noise and compression)
If you boost around tuning, you are asking the port or passive radiator to do more work. You want to make sure your port or passive radiator has enough headroom for your application.
A practical workflow
You can stay experimental and measurement-driven, without requiring you to speak fluent alignment-table. It is more fun that way too.
Step 1: Start with a normal design
Pick a reasonable box volume and tuning that would already work without EQ. Use a port or a passive radiator.
Step 2: Tune a bit lower than you normally would
Now deliberately tune a bit lower than your “boring but safe” alignment. In my experience, if the original box tuning was at Fb, I can tune it down to ~0.8 Fb.
In a simulation, you will usually see a droop or shelf near the bottom. That is fine. We will fix the shape with DSP.
Step 3: Add a peaking high-pass centered near the tuning region
Add a peaking high-pass and sweep it gently until the response looks like what you want.
At first, keep it modest. Think “seasoning,” not “dump the whole shaker.”
A good goal for early experiments is simply:
- flatten the low-frequency shelf
- or extend the effective corner by a noticeable amount
- no heroic boost.
Step 4: Verify the system is staying within limits
This is the real design step.
You want to confirm three things:
1) Driver excursion stays within reasonable range
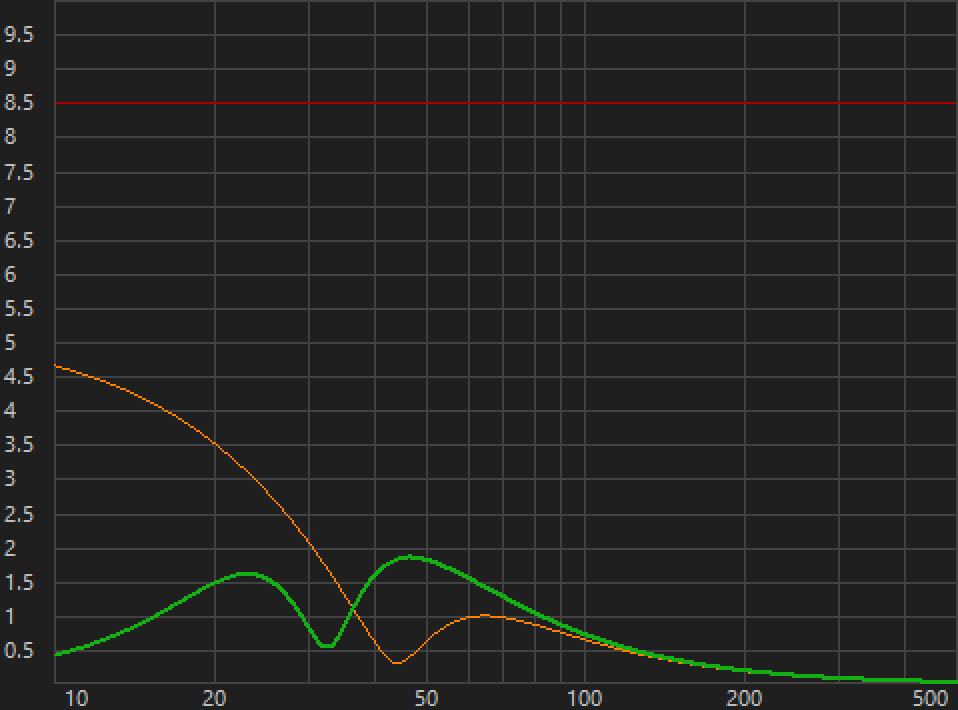
The peaking high-pass should not cause a big excursion hump just above Fb, and it should reduce the dangerous rise below Fb.
In the figure on the right we see with the peaking HP filter, cone excursion is better controlled below 30 Hz, while still within reasonable range above 30 Hz.
2) The port (or passive radiator) is not becoming the weak link
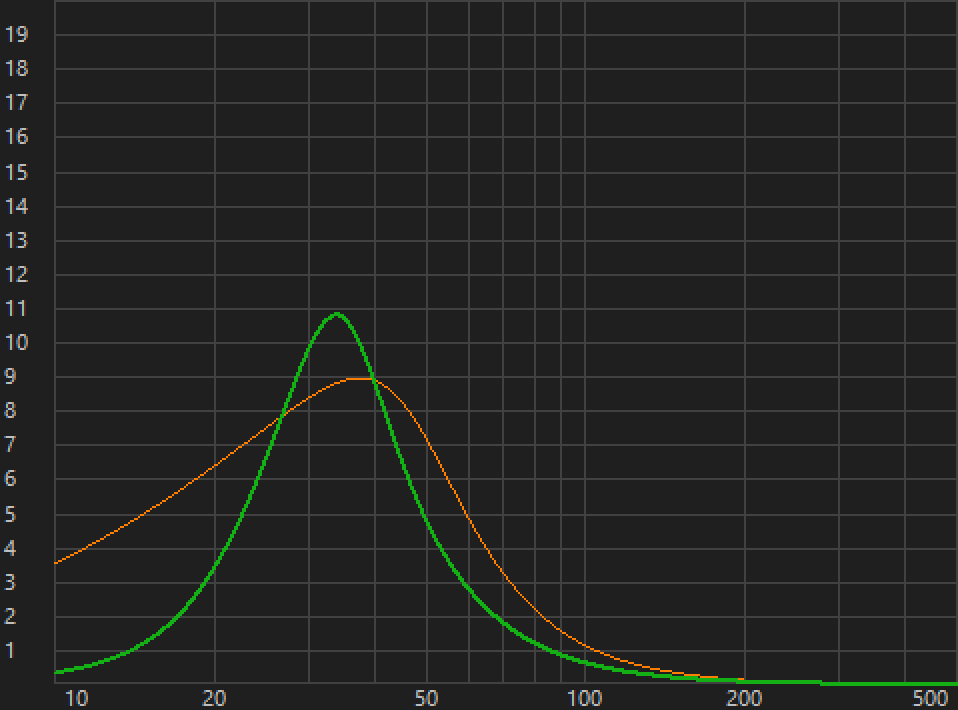
Ports can chuff or compress, so you may need to size up the port a bit to keep velocity down.
Passive radiators have their own excursion limits. If you boost too hard, the radiator becomes the first thing to complain.
In the figure on the right, you can see that peak port velocity is not appreciably higher than the default tuning to cause a worry.
3) You still have amplifier headroom Bass boost costs power quickly. Keep an eye on clipping and DSP headroom.
Step 5: Iterate like a DSP person
This is the fun part.
- Adjust tuning a little
- Adjust the peaking high-pass a little
- Listen/measure again
You can do ten versions of your bass alignment in an afternoon and pick the one that hits your goals.
How much bass can you get “for free”?
It is not free. You pay with amplifier power and radiator demands. But compared to increasing the box size, it is often a very attractive trade.
Once you see it work, it becomes one of the most satisfying examples of why active plus DSP feels like a superpower. You are not just accepting the box alignment, you are shaping it.
Wrap-up
A passive vented speaker is mostly stuck with the alignment you built.
An active plus DSP vented speaker can be tuned for good behavior, then “helped” where physics gives you headroom, while also being protected where physics gets dangerous.
And yes, once you have it working, be ready for people looking around for a subwoofer, because the amount of bass coming from the small enclosure can play tricks on your mind.